Stamp your image as you would normally....a line image works best.

With the lid closed, squeeze the stamp pad so that ink accumulates on the lid. Close To My Heart stamp pads work great for this. The pads are made to swing open so the ink always stays close to the surface of the pad.
 A blender pen has 2 tips...a nib for detail work and a brush end for larger areas. Chose the tip you will use based on the image you want to color and touch it to the ink in the lid. The pen contains a colorless fluid that will pick up the color.
 Begin to color your image. Keep moving the pen in a circular motion as the fluid in the pen can cause your cardstock to become to wet. You are able to add shading by coloring the areas you want darker first. I always keep a scrap paper near my work so that I can remove ink from the tip if I want the color to be less intense.
 Finish coloring your image. You can change colors very easily, but it is important to remember to clean the tip of the pen before dipping in another color. You can do this simply by rubbing the tip on that scrap paper you have next to your work. If you are not careful to remove the color, you will might mix the colors.
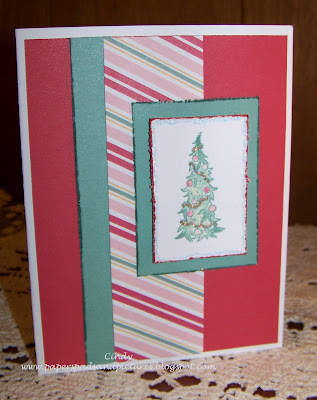
Now that you have completed the coloring, you can assemble the card. To complete this card, I started with a white A2 base. The tulip colored mat measures 5 1/4 inches X 4 inches. The two strips measure 5 1/4 inches X 1 1/2 inches. The Juniper color mat for the Christmas Tree is 2 3/4 inches X 2 inches. I finished off the colored tree with edge distressing and Prisma Glitter.
 The stripe paper is from Close To My Heart's new Idea Book. The pattern, called Jingle, uses Spring colors....Juniper, Tulip and Sorbet. Visit my website to see more examples of Jingle. Very interesting choices and the more I work with it the more I like it! What do you think? For Now, Happy Crafting!

3 comments:
I love the effect you get from this! You card is wonderful! Good luc with your upcomming crat show- I think Im doing one in November-but I am in no way prepared!!!
Thanks for the wonderful tutorial! Your card is so lovely.
Love the shading on your tree. Thanks for sharing.
Post a Comment