Wednesday, September 30, 2009

October Stamp of the Month Blog Hop

It's that time again....The Close To My Heart Stamp of the Month Blog Hop. The October STOM is great. It is called Holiday Warmth and has just about any kind of stamp you might need for those Holiday cards. By making a qualifying purchase, you can receive the stamp set at a reduced rate or even free. Check out my website for all of the details.


In a blog hop, a group of individuals posts an example of their work. If you got here from Adeline you are on the right track. My offerings for the month are "different." So many times, we work hard on our cards. We think of them as gifts to the recipient. And, we cross our fingers that it doesn't get thrown out. Well, to solve that problem, why don't we just frame the cards before we give them....


I brayered the background and glitter heat embossed the snowflakes in the sky. The packages were stamped, cut out and colored. I used 3D Foam to attach to the background. All products are CTMH.


I wanted to share another small "something" on this hop. Here is an altered binder clip using the STOM and CTMH paper.

Now hop on over to Carol's blog to see her great work. If you get lost, you can go back to the beginning by stopping by Judy's blog.

For Now, Happy Crafting!

Tuesday, September 29, 2009

So Much Paperwork...Too Little Time To Create!

I have so much paperwork that I can't hardly keep up. I don't have the time to create anymore... :o(

I wanted to remind everyone that October 1st is the next round for the Close To My Heart Monthly Stamp of the Month Blog Hop. Once again, there are many participants and I have something special prepared.

I also wanted to let everyone know that on October 1st (see why I am running out of time) I leave for CTMH's Regional Convention in Minneapolis MN. I can't wait. I have started a page on Facebook so that I can keep everyone updated on what is happening. You can become a Fan of the page by clicking on the button on my sidebar.

For Now, Happy Crafting!

Saturday, September 26, 2009

Craft Fair!

Well, I did it! I had my first table at a Craft Fair. What fun... :o) It was located at Augustus Lutheran Church in Trappe, PA. What a tranquil setting. The Church is the oldest unchanged standing Lutheran Church in continuous use in America. It has a fascinating history and their website has pictures of the interior. Anyway, back to the Craft Fair. It was well organized. All the spots were marked and each vendor had a reserved parking spot right at their location. Boy did that make life easier. Having no prior experience, I had no idea what set up works best or how much product to take. I've read that having your own business means that you have to leave your comfort zone. Today was a perfect example. I used my best judgement drawing for all the Craft Fairs I have been to in the past, talking with friends and research on the Internet. Here is what I came up with....that's DH standing in the background.


I had lose cards and card sets, bookmarks, door hangers, altered binder clips, altered clothes pins, altered composition books, tile coasters, altered tea lights, some crocheted items and Close To My Heart Idea Books. When all was said and done, I didn't sell as much as I had hoped, but I did sell some things. I met some wonderful people and made some great contacts. Will I do it again??? Absolutely! As a matter of fact, I have signed up to participate in another one in October. More details to follow on that big event. :o)


By the way, I realized that I haven't given you an update on the new Kitty...Bombay. She is alive and kicking....no really, kicking. My arms and legs look like her scratching post. She's now about 12 weeks old and has a great personality. The scratches are from her playing! She is so mischievous and without warning, plops on your lap and goes to sleep. What joy to have a "child" in the house! :o)

For Now, Happy Crafting!

Monday, September 21, 2009

A Quick and Fun Halloween Card

I can't believe that the summer is over....but, with that being said, now comes a really fun time of year! You can feel the air become cooler as the sun begins to set....makes one think of falling leaves and Halloween.


For today's Clean and Simple Challenge, I made a Halloween card. The challenge was to complete a card following a sketch that can be found here.


What a simple card to complete. I randomly stamped the bats (from the Festivities stamp set) on the small strip of Colonial White. The "B" is from Classmates Alphabet and the buttons are threaded with Waxy Flax and attached with Liquid Glass. I used a black glitter pen to highlight some for the bats wings. All of the items used to make this card are Close To My Heart.

This card was Fast, Simple and Easy. Just like CTMH's philosophy of "Faster, Simpler, Easier." It doesn't get any better than that.

By the way, a special Thank You to Suzanne at Card of the Week for mentioning my post from a few days ago...."Experimenting with Backgrounds."

For Now, Happy Crafting!

Sunday, September 20, 2009

Another Fun Background

Yesterday I was fortunate enough to have the opportunity to take Michelle Zindorf's Brayering Worshop. Michelle travels the country teaching fellow stampers how to create wonderful backgrounds using a brayer. Check out her website for more of her terrific creations.


I've played with a brayer, but never been able to achieve the same wonderful effects as Michelle taught yesterday. We made 3 cards (oh the pressure). I was pooped when I got home. This morning I gave the technique a try on my own.

Techniques are universal. Regardless of what stamps or inks you use, the basic premise is the same. The Owl is from CTMH's "Whooo Loves You" set and the papers used are Autumn Terracotta and Sunflower. The inks include Autumn Terracotta, Sunflower, Smokey Plum, Chocolate and Cocoa (all CTMH). The pattern paper is from a pack called Enchanted. BTW, Enchanted will be retiring at the end of December. Check my sidebar for a list of papers that are retiring. If there are any there that you like, visit my website to place an order. I understand that there are a few that are already out of stock!

I think I was able to remember what I learned yesterday. What do you think? For Now, Happy Crafting!

Saturday, September 19, 2009

Experimenting with Backgrounds

This morning, I finally was able to complete a project. I thought that it would be fun to put a twist on backgrounds made with alcohol inks. I know that it is customary to apply the inks with felt. I have felt, but wanted to try something different. I grabbed a sponge, my inks and glossy card stock and got started. Let me show you how I did it...

Collect up your supplies. To do this background, I used Adirondack Alcohol Inks in Butterscotch, Lettuce and Cranberry. I also used the Blending Solution and the Silver Mixative. You also need the glossy card stock and an old clean sponge.


I placed several drops of the Butterscotch ink on the sponge. Using a swiping motion and covered the card stock. I did not worry about even coverage.


Next I took the same sponge and added drops of Lettuce and Cranberry ink. I also added a generous amount of the blending solution. When I used the same swiping motion on the card stock, the blending solution "mixed" the colors.


The next step included adding the silver mixative and more blending solution to the sponge and swiping again. By this time with all of the blending solution, the background is really "swirled."


Once the inks dried, I began to stamp images. Using the largest stamp first, I randomly stamped the leaf using StazOn.


To finish the background, I randomly stamped smaller leaf stamps. This time I used dye ink but misted them with alcohol. I mixed a few drops of matching re-inker with the alcohol as not to dilute the color.


The background is now ready to be used. The possibilities for a background like this are endless. Here is what I did with mine.


The card is done on a Colonial White A2 card base. I lightly sponged the edges with New England Ivy. The two mats are cut from New England Ivy and Autumn Terracotta. The chipboard ribbon glide was sponged with New England Ivy and the sentiment was stamped with Autumn Terracotta. The ribbon is also Autumn Terracotta. The two leaves at the top were stamped with New England Ivy, cut out and sponged with Autumn Terracotta and Barn Red to add depth. The stamps are from Nature Walk and Give Thanks. Everything used is from Close To My Heart.

This is a fun, different and very easy background. You should give it a try. For Now, Happy Crafting!

Tuesday, September 15, 2009

Celebrate

I'm celebrating! I finally got to make a card yesterday. Whew, I can't believe how busy I have been. And, my schedule shows no end until the middle of October. :o)


This card was done for Splitcoaststampers Clean and Simple Challenge 32. The challenge was a simple. Complete a wedding card. If you remember, a Clean and Simple card is one that can be made quickly and with few embellishments. The card is done on a 4 1/2 x 4 1/2 base of Colonial White Cardstock. Juniper is the accent color. I tried something I have never done before. Heat embossing was used on the stamped images. I applied both Juniper ink and VersaMark to the image before I stamped. I was trying to get the Juniper ink to show along with the sparkle of the embossing. Did it work....what do you think? By the way, the image is from the Fringed Phrases Stamp Set. All products are Close To My Heart.

For Now, Happy Crafting

Sunday, September 13, 2009

A Great Workshop

Whew, have I been busy. Between making goodies for the upcoming Craft Fair, preparing for Saturday's Workshop to kick off the new Idea Book and life in general, I haven't had a chance to post anything.


Yesterday, we had a great workshop. The plan was for me to teach how to use a blending pen so that the gals could make a gift tag and oooh and aaah over the new products. Well, ya go with the flow. The ladies arrived, saw all the goodies I made with the new papers and stamps and the immediately decided that they wanted to learn to make them too. They picked out binder clips. So we spent the afternoon learning to work with blender pens, aqua painters and made altered binder clips. What fun. I so enjoy watching faces light up when creative juices begin to flow. This is a picture of some of the ladies showing off their work.


I am so enjoying being a Close To My Heart Consultant. The opportunity to teach and share is a wonderful experience. If you ever have considered it, contact me and I will tell you more. For Now, Happy Crafting!

Monday, September 7, 2009

Coloring with a Blending Pen

Did you ever want to color a small stamp quickly? Using your stamp pads and a blending pen works really well. Here is how to do it....


Stamp your image as you would normally....a line image works best.


With the lid closed, squeeze the stamp pad so that ink accumulates on the lid. Close To My Heart stamp pads work great for this. The pads are made to swing open so the ink always stays close to the surface of the pad.


A blender pen has 2 tips...a nib for detail work and a brush end for larger areas. Chose the tip you will use based on the image you want to color and touch it to the ink in the lid. The pen contains a colorless fluid that will pick up the color.


Begin to color your image. Keep moving the pen in a circular motion as the fluid in the pen can cause your cardstock to become to wet. You are able to add shading by coloring the areas you want darker first. I always keep a scrap paper near my work so that I can remove ink from the tip if I want the color to be less intense.


Continue to color your image.


Finish coloring your image. You can change colors very easily, but it is important to remember to clean the tip of the pen before dipping in another color. You can do this simply by rubbing the tip on that scrap paper you have next to your work. If you are not careful to remove the color, you will might mix the colors.


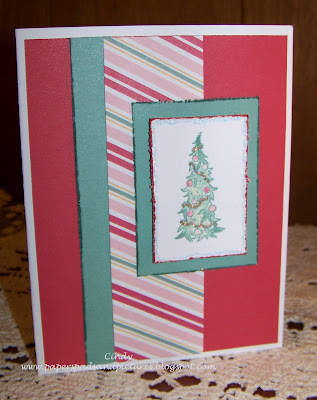
Now that you have completed the coloring, you can assemble the card. To complete this card, I started with a white A2 base. The tulip colored mat measures 5 1/4 inches X 4 inches. The two strips measure 5 1/4 inches X 1 1/2 inches. The Juniper color mat for the Christmas Tree is 2 3/4 inches X 2 inches. I finished off the colored tree with edge distressing and Prisma Glitter.

The stripe paper is from Close To My Heart's new Idea Book. The pattern, called Jingle, uses Spring colors....Juniper, Tulip and Sorbet. Visit my website to see more examples of Jingle. Very interesting choices and the more I work with it the more I like it! What do you think? For Now, Happy Crafting!

Sunday, September 6, 2009

Close To My Heart Newsletter

The September Newsletter is done. If you are on my mailing list and didn't receive your copy, please let me know and I will forward it to you. If you would like to receive a copy, also, please let me know. For Now, Happy Crafting!

Wednesday, September 2, 2009

Becoming A Close To My Heart Consultant

I just had to post this picture. A few days ago, I told you about the new addition to the household....Bombay....the now 8 week old kitten. Well, I walked away from my craft table for just a minute and upon my return, look what I found....


A future Close To My Heart Consultant??? What do you think???

BTW - If you have ever considered becoming a CTMH Consultant, let me tell you, I am very happy. The discount and commission is very good. Consultant Services is wonderful to deal with, there is great support from CTMH "sisters," and I have met so many wonderful people that I would have never met if it weren't for CTMH. If you are interested in learning more about being a consultant, please contact me. Let me help you share the joy. For Now, Happy Crafting!

New Idea Book Christmas Ornament and Card

As I mentioned, the Fall/Winter 2009 Idea Book is here!!! Yippee....I love so many of the new stamps and papers. Here are two examples of artwork made from with the brand new items....

I fell in love with this little guy pulling the red wagon....reminds me of my youth. Anyway, he is one of the stamps included in the new set called "Santa's List." Other stamps in this set include a Santa, a tree and a "Naughty or Nice" list. It is a great set and can be found on page 46 of the new catalogue. To make this ornament, I sponged green, red and gold alcohol ink on a 4 x 4 inch acrylic square. When dry, I attached the olive cardstock. I stamped the image in Cocoa ink, colored it with my Prisma Markers, added a little glitter and attached to the olive cardstock. I tied the red ribbon on the top and we have a quick Christmas Ornament. It doesn't show well, but the lights reflect beautifully through the alcohol inks.


Here is another very quick card made with the Twitterpatted Workshop on the Go set. New to CTMH are Workshop on the Go project sets. Each set includes a Level 2 pack of paper, embellishments and most importantly, a special stamp set that can only be purchased with the WOTG set! These sets take "Faster Simpler Easier" to the next level. I made this card in about 5 minutes and look how cute. The hedgehog is only available in the special set. The sets can be purchased for $29.99. To see more examples of artwork made with this set and other Workshop on the Go sets click here. Contact me if you want to purchase a set or have any questions.


Enjoy the new Idea Book. You can find it on my website or if you would like a copy to hold in your hand, please contact me so that I may get you one. For Now, Happy Crafting!

Tuesday, September 1, 2009

September Close To My Heart Stamp of the Month Blog Hop

September is a very special month for Close To My Heart. Not only is today the long awaited day for the new Fall and Winter Idea Book to be officially released, it’s time for the September Stamp of the Month Blog Hop! I will be sharing goodies from the new Idea Book under separate posts. This post is dedicated to the wonderful Stamp of the Month called “Treasures.” Each month, CTMH releases a very special stamp set available only that month. You may purchase it, or it may be yours for free with a qualifying purchase. If you got here from Kathleen’s blog, you are on the right track. The full blog list is below if you get lost along the way.

This month, I wanted to do something different. In honor of the start of the school year, I made an altered composition book. The book features not only Treasures, but also, an example of paper from the newly released Idea Book. The paper is called “Twitterpatted.” After I covered the outside with Colonial White cardstock and attached Twitterpatted to the spine, I sponged color on the edges. I used Garden Green, Sorbet and Chocolate. I stamped the small flower images. The larger imaged needed depth. If you look closely, you will see 2 shades (Sorbet and Chocolate.) I loaded my brayer with both colors and rolled the color on the stamp.


I also made this cute little card on a 3 x 6 base using Treasures and another example of new papers from the Idea Book. This paper is called “Sweet Home” and the colors used include Garnet, Indian Corn Blue, Crystal Blue and Colonial White.

It’s time to hop on over to Dawn’s blog to see her wonderful artwork. Don’t forget to check out all of the great projects made by so many CTMH Consultants.
Don’t forget, also, to check out the new Fall/Winter Idea Book that can be found on my website!

For Now, Happy Crafting!


Jena http://www.livelovelaughscrapbook.blogspot.com/
Nona http://www.nonapearl.blogspot.com/
Katy http://www.scrappinkaty.blogspot.com/
Cibele http://www.flowerfoot.blogspot.com/
Laura http://www.thecroppersconnection.blogspot.com/
Lori http://www.pinkcloudscrappers.blogspot.com/
Jamia http://www.papermadnessinc.blogspot.com/
Melissa http://www.fancymelissa.blogspot.com/
Pamela http://www.cherishyourmemories.blogspot.com/
Sheila http://sheila-bennett.blogspot.com/
Adeline http://adeline-brill.blogspot.com/
Wendy http://www.myscrapbookingblog.com/
Beth http://www.bethscreativeblock.blogspot.com/
Barbra http://barbraotten.blogspot.com/
Terrie http://www.my-life-in-real-time.blogspot.com/
Judy http://makingtimeformemories.blogspot.com/
Jessica http://jessicabooth.blogspot.com/
Leisa http://www.bigredscraps.blogspot.com/
Helen http://www.hookedonstamping.com/
Debra http://memoriesoftheheartbydeb.blogspot.com/
Juli http://www.thestampteacher.blogspot.com/
Sarita http://www.blessedscrapper.blogspot.com/
Michelle http://www.amaizenbluelady.typepad.com/
Maricar http://www.maricarharris.blogspot.com/
Antoinette http://www.godblessyourart.blogspot.com/
Kathleen http://bowlofstamps.blogspot.com/
Cindy http://www.paperspadsandpictures.blogspot.com/
Dawn http://www.stamptildawn.blogspot.com/
Barbara http://www.paper-creations117.blogspot.com/
Alanna http://www.damoses.blogspot.com/
Laurie http://www.creationsbylaurie.blogspot.com/
Tanya http://www.scramperscorner.blogspot.com/
Karen http://www.gettinscrappywithit.blogspot.com/
Jan http://scrapandstamp4ever.blogspot.com/
Tammy Lea http://mycreativeclubhouse.blogspot.com/
Paige http://www.paigespaperparadise.blogspot.com/
Kelly http://www.stampinallday.blogspot.com/
Sherry http://www.picturespatternsandpaper.blogspot.com/
Deb http://www.scrapbookczar.blogspot.com/
Nancy http://www.ballisticdesign.blogspot.com/
Chris http://www.houseostamps.wordpress.com/
Dawn http://www.iamahappystamper.blogspot.com/
Brae http://thebrae-er.blogspot.com/
Laurie http://scrapsfromthebeach.blogspot.com/
Haley http://www.inkyscrapper.blogspot.com/
Carol http://craftycarol55.blogspot.com/
Amy http://www.clearlystamping.blogspot.com/
Carla http://www.carlacreates.blogspot.com/
Jen http://www.jenrubio.blogspot.com/
Kristie http://www.goofyscrapper.blogspot.com/
Jill http://scrapwench.blogspot.com/
Wanda http://www.creatingwithwanda.blogspot.com/
Miranda http://www.scrampinwithmiranda.com/
Jody http://www.cre8nmemories.blogspot.com/
Susan http://www.stampingintheopen.blogspot.com/
Kami http://www.scrappin4memories.blogspot.com/
Jennifer http://www.roxybonds-scrappin.blogspot.com/
Julia http://www.ralphandjulia.blogspot.com/
Shannon http://www.mycolorfulworldinvt.blogspot.com/
Linda http://www.awesomememories.blogspot.com/
Brenda http://keepsakeswithheart.blogspot.com/
Donni http://www.donniscreativetherapy.blogspot.com/
Nancy http://www.creativelyartsygallery.blogspot.com/